Chapter 3 – The ODUI Buckets Explained
One idea, four buckets. Buckets turn urgent–important logic into daily behaviour.
3.1 Why Buckets Exist
Most teams already have some form of prioritisation — spreadsheets, backlogs, coloured quadrants on slides. Yet, despite all that effort, people still argue about what matters most, when to act, and how much energy to spend.
The problem usually isn’t a lack of tools. It’s that most systems are too complex, too flat or too static to match how real work behaves.
Linear lists hide relationships
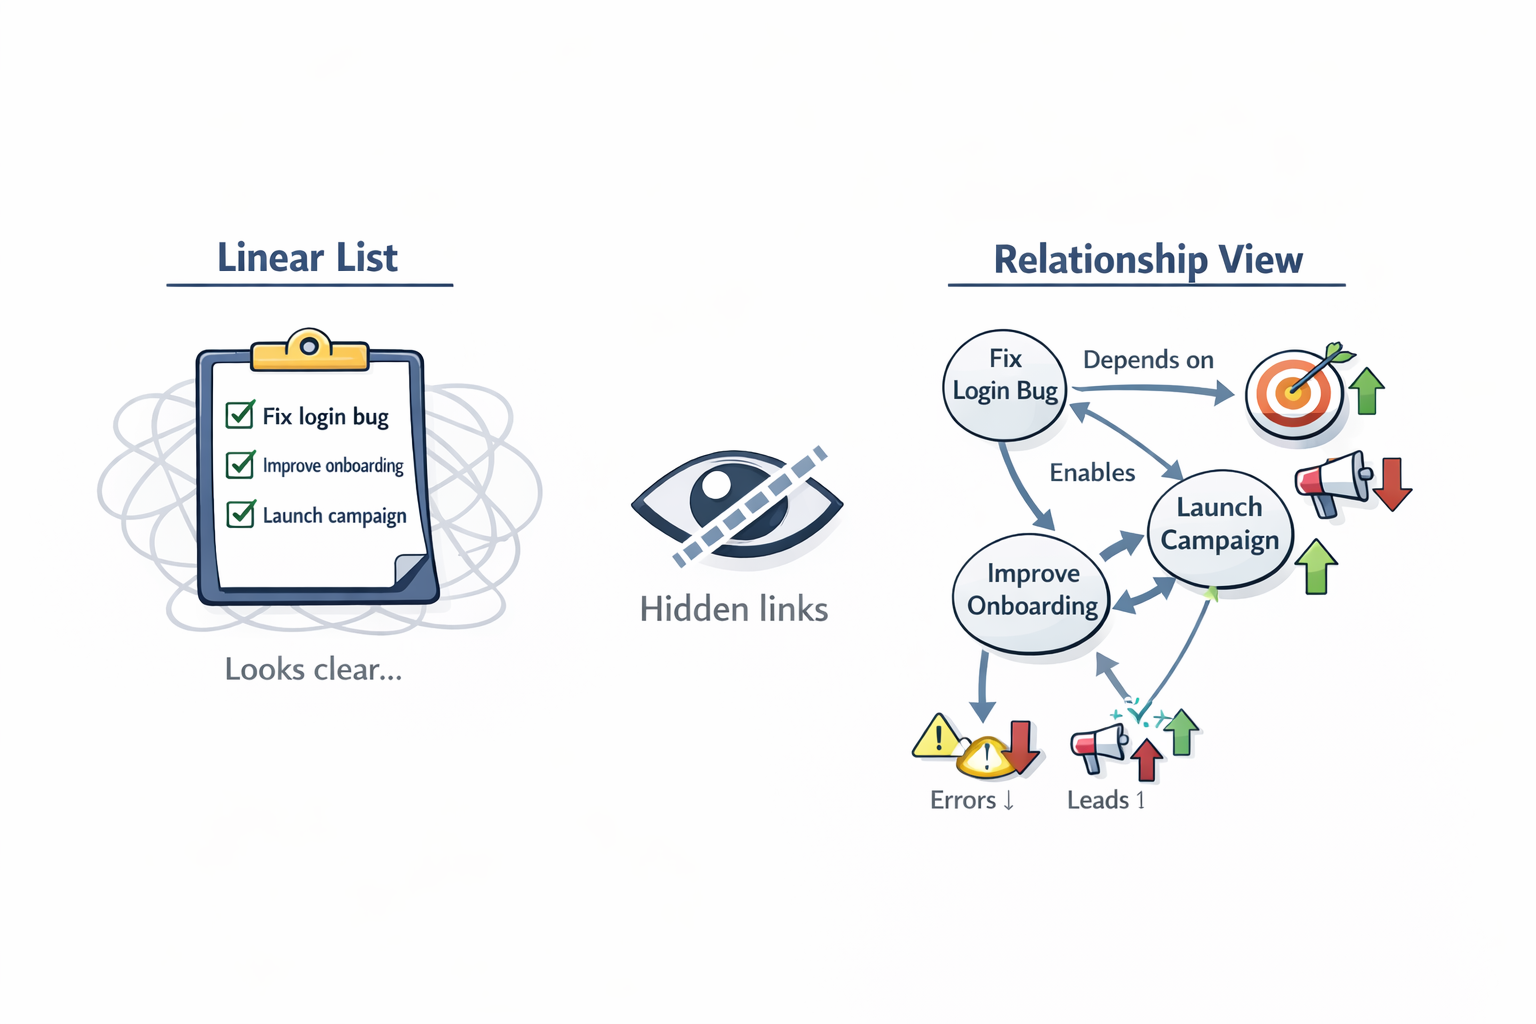 In real companies, priority is not just a “1 to 100” ranking.
Your backlog probably has scores, tags, deadlines, maybe even formulas like RICE or WSJF. On the screen it looks rational and fair: highest score on top, lowest score at the bottom.
In real companies, priority is not just a “1 to 100” ranking.
Your backlog probably has scores, tags, deadlines, maybe even formulas like RICE or WSJF. On the screen it looks rational and fair: highest score on top, lowest score at the bottom.
But it is still one long line.
That single line quietly mixes together very different kinds of work:
- firefighting and incidents
- maintenance and small fixes
- experiments and new bets
- long-term strategic projects
- compliance and risk work
- people and relationship work
They all look like the same kind of thing: one row in a table.
You cannot easily see:
- which tasks belong to the same outcome
- which items are protecting you from risk
- which ones are optional “nice ideas”
- which ones need deep focus vs quick reactive energy
So people do what humans always do: they pick the easiest, the loudest, or the one with the nearest deadline — even if the list says something else has a higher score.
The problem is not the scoring formulas. The problem is believing that one clever calculation and one linear list equal real priority in daily life.
A tiny but urgent risk can hide under a big, shiny feature with a better score. A long-term improvement can quietly slide down the backlog until it “no longer fits in the quarter”.
Quadrants freeze reality
Many teams go one step further and use matrices like “urgent vs important” or “impact vs effort”. This is already better: it adds a second dimension and creates richer conversations.
But these models are still mostly planning tools, not behaviour tools.
They capture how the world looked on the day you filled them in. Then reality moves:
- a quiet risk suddenly becomes urgent
- a strategic project gets a hard deadline
- a dependency appears and blocks half the work
In theory, you would keep the matrix updated. In real life, people update it at the next workshop, not on the next Tuesday morning.
The result: smart-looking diagrams that shape one or two meetings, then slowly fade while people go back to their inbox, chat, ticket system, and calendar — where the real decisions happen.
Buckets bring motion and behaviour
 ODUI introduces buckets as the bridge between structure and flexibility.
Buckets are living containers of focus — work flows in, evolves, and flows out as the situation changes.
ODUI introduces buckets as the bridge between structure and flexibility.
Buckets are living containers of focus — work flows in, evolves, and flows out as the situation changes.
You might think:
“We already tag work as urgent, important, strategic, etc. Why is this different?”
Most systems stop at labelling work. ODUI goes one step further: each bucket also defines how we treat that work in daily life.
Each bucket defines not only what the work is (more urgent or more important), but also how people should behave while doing it:
- Speed — how fast should we act?
- Communication — who needs updates, and how often?
- Measurement — what evidence proves progress here?
- Protection — when is it OK to say “no” to interruptions?
So when an item moves into a different bucket, it doesn’t just change colour. It changes the rules of the game around it.
This is the key difference:
- Other systems tell you which item is higher on the list.
- ODUI also tells you what kind of energy and behaviour this item deserves.
That behavioural layer turns prioritisation from a planning exercise into real performance on a normal Tuesday.
A realistic metaphor
The word bucket was chosen deliberately.
A bucket has finite space — when it is full, you must stop adding until something comes out. This mirrors real capacity: people cannot keep pouring in new “top priorities” forever.
Buckets make the invisible limit visible.
In short: Lists show order. Matrices show logic. Buckets also show behaviour and capacity.
3.2 The Four Buckets at a Glance
This table gives you a quick snapshot of each ODUI bucket. Use it to classify first, then go deeper with the detailed rules in the next sections.
| Bucket | Guiding Motto | Core Purpose | Typical Examples | Success Signals |
|---|---|---|---|---|
| B1 – Keeps You Alive | Survival / Urgent & Important | Protect stability, legality, and safety. | Incidents, outages, security breaches, critical compliance tasks. | Fast resolution, clear communication, fewer repeats. |
| B2 – Makes You Great | Growth / Not Urgent but Important | Create measurable, lasting value. | Outcome-led features, efficiency improvements, prevention work. | Movement in key KPIs, strong adoption, higher quality and reliability. |
| B3 – Keeps Others Quiet | Diplomacy / Urgent but Not Important | Honour commitments and relationships. | Regulator requests, partner commitments, special executive asks. | Predictable delivery, expectations managed, trust intact. |
| B4 – Keeps Ideas Breathing | Exploration / Not Urgent & Not Important | Explore future possibilities safely. | New concepts, prototypes, experiments, hypotheses. | Clear learnings, fast feedback, ideas graduating from B4 into B2. |
You do not need to get this perfect on day one. Even “good enough” classification helps teams talk about work the same way and spot obvious imbalances early.
3.3 B1 — Keeps You Alive
What B1 is
An urgent work that protects the system from immediate failure.
Quick test for B1:
If the honest answer to both questions is yes:
- Is this urgent right now?
- Will it seriously hurt us if we do not act now?
…then the work belongs in B1.
B1 work is about survival and stability. It is the combination of urgent and important with real near-term harm if you ignore it.
Typical B1 harm looks like: breaking the law, halting revenue, damaging customer trust, or threatening safety. If you can safely wait weeks or months, it is not B1 — it is probably B2 or B3.
B1 is not about panic; it is about precision under pressure. The goal is to act quickly but calmly, contain the risk, restore normal operations, and learn from what went wrong.
What belongs in B1
Work belongs in B1 only when there is clear, near-term harm if you do nothing. Typical examples:
- Critical incidents and outages: Anything that stops key systems or operations, such as security breaches, payment failures, or data corruption.
- Compliance or legal mandates: Government or regulatory demands with strict timelines and material penalties for delay.
- Customer trust events: Fraud, data exposure, public errors, or severe service degradation that threatens reputation.
- Health, safety, or security emergencies: Anything that affects physical or digital wellbeing.
Each of these requires an immediate, coordinated response with clear ownership and communication.
What does not belong in B1
Keeping B1 “pure” is essential. If everything becomes B1, nothing really is.
- Important but can safely wait a few weeks → usually B2.
- Urgent but not truly harmful if delayed → usually B3.
These usually do not belong in B1:
- Cosmetic bugs or usability tweaks: They may irritate users but do not damage trust, safety, or compliance. (Often B3.)
- Preventive improvements or automation: They help prevent B1 incidents in the future but are not B1 today. (Belong in B2.)
- Internal escalations without measurable risk: Frustration alone does not make a task B1.
Keeping B1 focused on real risk prevents the whole system collapsing into permanent firefighting.
How to behave (B1 discipline)
 Handling B1 requires a distinct mindset: fast, factual, and focused.
Every action should reduce risk or uncertainty.
Handling B1 requires a distinct mindset: fast, factual, and focused.
Every action should reduce risk or uncertainty.
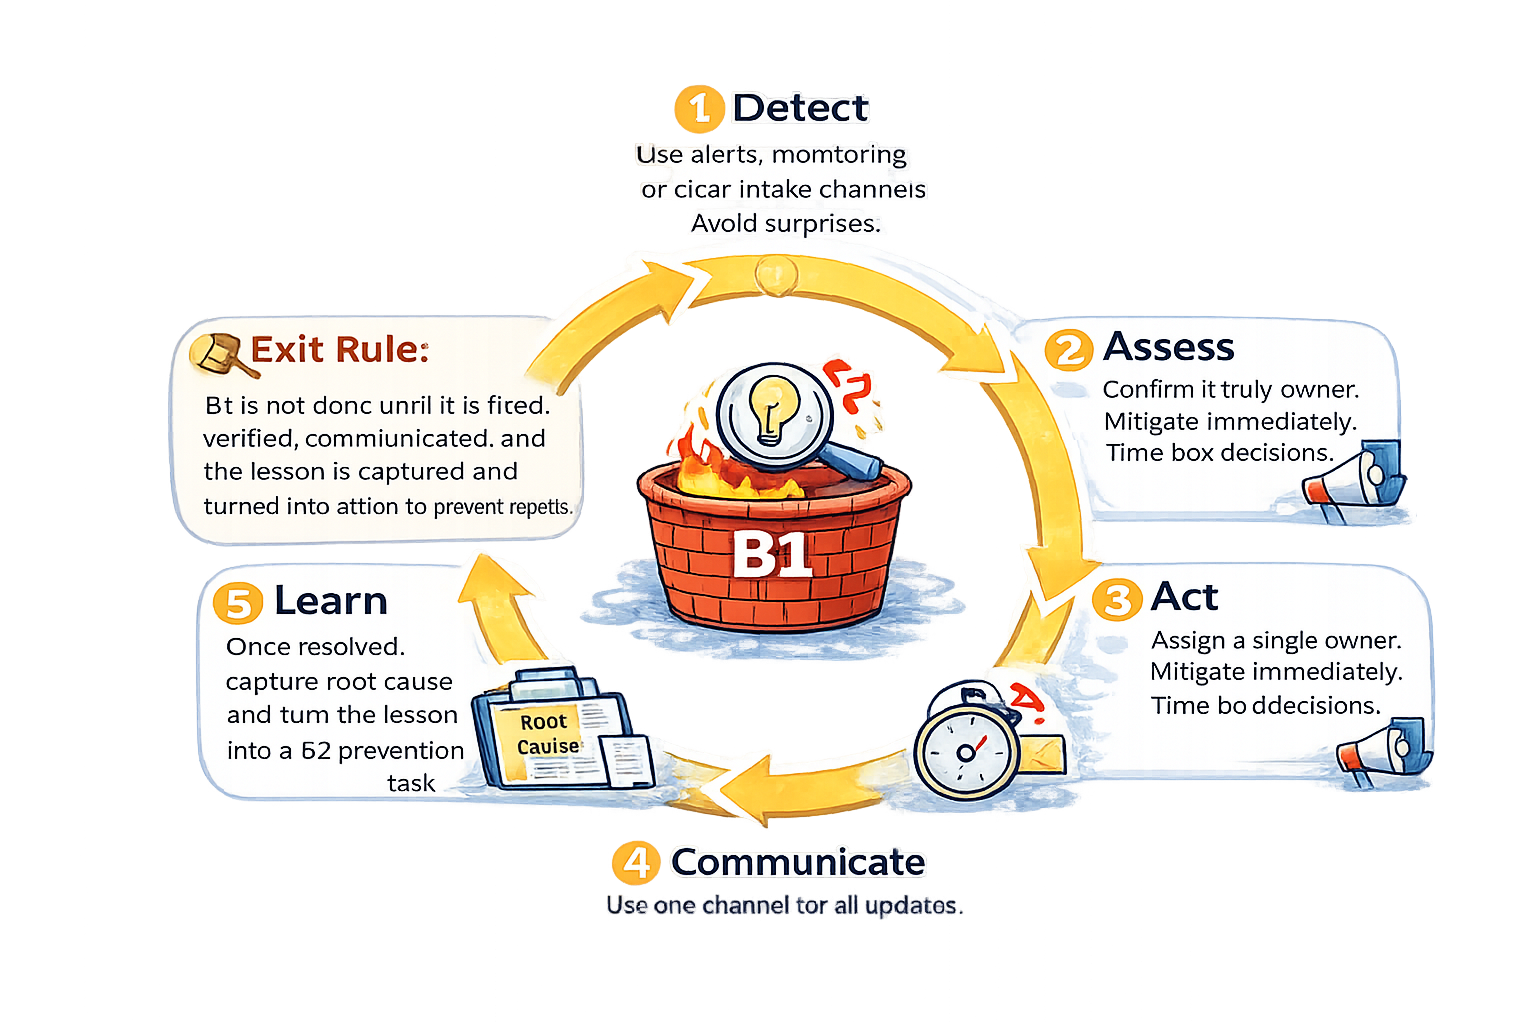
A simple B1 loop:
- Detect: Use alerts, monitoring, or clear intake channels. Avoid surprises.
- Assess: Confirm it truly meets B1 criteria. Ask: “What happens if we don’t act now?”
- Act: Assign a single owner. Mitigate immediately. Time-box decisions. Aim for containment, not perfection.
- Communicate: Use one channel for all updates. Report facts only: impact → action → ETA (expected time to restore or deliver). Avoid speculation.
- Learn: Once resolved, capture root cause and turn the lesson into a B2 prevention task.
Exit rule: B1 is not done until it is fixed, verified, communicated, and the lesson is captured and turned into action to prevent repeats.
Capacity and rhythm
B1 will never be zero — things break or change. The goal is to keep it small and under control.
- Keep B1 visible but small — ideally less than 10–15% of total capacity over time.
- Expect occasional spikes, but maintain a B1 buffer so you can absorb them without derailing B2.
- Run weekly mini-reviews to check B1 volume, root causes, and prevention progress.
- Celebrate a quiet B1 week — it means prevention and B2 are paying off.
When B1 regularly exceeds 15% of capacity, treat it as a signal, not fate. You likely need more B2 prevention work or stronger filters for what counts as B1.
B1 KPIs that matter
Measuring B1 performance is not about punishing mistakes. It is about strengthening your resilience loop: take a hit, recover, learn, and come back stronger.
- Time to Detect (TtD): How quickly an issue is discovered after it occurs. Shorter TtD means monitoring and alert channels are healthy. Long delays suggest blind spots or over-reliance on customers to find problems.
Goal: make detection proactive, not reactive.
- Time to Resolve (TtR): The time from detection to full recovery. TtR reflects both technical capability and decision speed. Lower TtR means fewer users impacted and less business risk.
Goal: resolve fast without skipping post-incident learning.
- Repeat Incident Rate (RIR): How often the same or similar issue reappears. A high repeat rate means problems are treated as isolated events, not system issues.
Goal: drive the repeat rate toward zero by turning every fix into B2 prevention work.
- Mean Time Between Incidents (MTBI): The average time between major incidents. Longer MTBI indicates improved stability; short gaps show that firefighting is still part of daily life.
Goal: steadily increase MTBI while keeping alerts accurate.
- % of B1 lessons converted to B2 prevention tasks: The most telling sign of maturity. It shows whether the organisation treats crises as noise or as learning opportunities.
Goal: ensure every B1 generates at least one measurable prevention action in B2.
Together, these KPIs form a simple resilience dashboard. When you detect faster, resolve smarter, and prevent repeats, your B1 system evolves from reactive firefighting into reliable resilience.
3.4 B2 — Makes You Great
What B2 is
A focused work that improves the system’s future performance and capability.
Quick test for B2:
If the honest answer to these questions is yes:
- Urgency: Can we safely schedule this for later (days or weeks) without causing harm if we wait?
- Importance: Will this meaningfully improve future performance, competitiveness, or stability?
- Evidence: Can we describe a clear outcome or metric that will show if it worked?
…then the work belongs in B2.
B2 is the engine of progress. It is intentional, outcome-driven work that moves the organisation forward. Improving strategy execution, product value, customer experience, or operational efficiency.
Unlike B1 (protects what exists), B2 builds what’s next.
B2 is where teams invest in compounding improvement — work that may not demand immediate action but delivers outsized benefits over time. It is proactive, steady, and measurable. Every hour spent here strengthens tomorrow’s stability and competitiveness.
B2 work is not reactive; it is designed. This is where OKRs, KPIs, and continuous improvement live and breathe.
Simple rule: B1 keeps you alive, but B2 makes you great. Without consistent B2 investment, organisations decay into firefighting.
What Belongs in B2
B2 includes work that turns strategy into measurable progress — where effort is directly linked to outcomes.
You can re-check the B2 test:
- It is not urgent right now — you can safely schedule it.
- It is important for the future.
- It has a clear outcome or metric.
Typical examples:
- Features and improvements tied to clear KPIs: Changes that move a meaningful needle — retention, revenue, speed, satisfaction, cost-to-serve, error rate, etc. The KPI is the proof of importance; without it, the task risks being just another idea.
Examples: reducing checkout steps to improve conversion; introducing self-service to lower support cost.
- Process and system changes that scale efficiency and quality B2 is where operational excellence lives. It is about refining how work flows so people can deliver more value with less friction.
Examples: automating test pipelines, improving onboarding, or redesigning approval flows to cut cycle time.
- Prevention born from B1 lessons Every B1 incident should generate one or more B2 prevention actions — automation, better monitoring, improved design, clearer documentation, or more resilient architecture. This turns pain into progress.
Example: after a data breach, the team invests in encryption automation and access audits so the same issue cannot recur.
B2 is a long game — each improvement compounds.
The more you invest here, the fewer surprises appear in B1, and the more freedom you gain for B4 innovation.
What Does Not Belong in B2
B2 is about real improvement, not just activity. The following usually do not belong in B2:
- Unmeasured activity: Work with no clear KPI, hypothesis, or baseline. If you cannot measure progress, it is not improvement.
- Cosmetic or purely subjective changes: Tasks that make things look different but not perform better.
- One-off stakeholder favours: Items driven mainly by politics or visibility rather than outcomes. (Often B3.)
- Exploratory ideas without validation: Promising concepts with unclear impact or readiness. (These live in B4.)
- Maintenance or reactive fixes: If it is about restoring what is broken, it is B1. If it is about improving systems for the future, it is B2.
3.5 B3 – Keeps Others Quiet
What B3 Is
A work that maintains alignment, trust, and social stability around the system.
Quick test for B3:
If the honest answer to these questions is yes:
- Urgency: Is someone outside your team expecting this within a clear time window (explicit or implied), and will they start chasing you if it slips?
- Importance: Would delaying it too long damage trust, confidence, or the relationship, even if it does not threaten survival or long-term strategy?
- Evidence: Can you name a specific stakeholder, regulator, client, or executive who cares about this?
…then the work likely belongs in B3.
B3 work lives in the space between diplomacy and delivery. It is external or reputation-sensitive work — the kind that does not necessarily push your strategy forward but protects trust and relationships with regulators, partners, clients, and internal executives.
B3 tasks are often driven by obligation, perception, or politics rather than direct, measurable improvement. Yet they are crucial, because ignoring them risks credibility, compliance, or key relationships.
Managing B3 well keeps noise low, expectations stable, and reputation intact.
Think of B3 as the social contract of work. It is how you keep others confident that your organisation is competent, responsive, and respectful.
In ODUI terms, B3 is the diplomacy bucket.
What Belongs in B3
B3 includes work that maintains harmony, compliance, and trust, but does not directly deliver long-term growth.
You can re-check the B3 test:
- There is time pressure from others (explicit deadline or implied expectation).
- Delay would hurt trust or confidence, not kill the business.
- A clear stakeholder or obligation is attached.
Typical examples:
- Regulator or audit requests that are mandatory but not existential Compliance tasks that will not destroy the business if delayed a little, but still carry reputational or legal risk if ignored.
Examples: providing documentation for a financial review, submitting updated data reports, responding to non-critical audit findings.
- Partner or client change requests, integration asks, and bespoke reports External partners request adjustments, integrations, or reports that make their life easier. Individually they are low impact, but together they can consume massive time if unmanaged.
Example: a client asks for a custom export format or an integration with their analytics tool. It is not strategic, but it keeps the relationship healthy.
- Executive specials that fall outside current B2 outcomes Senior leaders request presentations, analysis, or short-term initiatives driven by visibility or narrative, not by existing B2 goals.
Examples: an investor briefing, a custom dashboard requested by the CEO, or a one-off deep-dive report.
B3 work is about diplomacy and discipline: doing what is needed — no more, no less. It is not about saying “yes” to everything; it is about saying yes smartly — with clear boundaries, timelines, and expectations.
Handled well, B3 protects organisational reputation without draining the energy that fuels B2 progress. Handled poorly, it becomes a black hole of busyness, where teams look active but deliver little measurable value.
In essence: B3 keeps relationships healthy, not just systems compliant. It is the lubricant that lets real progress (B2) happen without friction.
What Does Not Belong in B3
It is easy for B3 to become the “catch-all” for anything external or loud. But not everything that comes from outside deserves B3 treatment.
The key is to protect B3 from overload — focusing on legitimate obligations, not emotional requests.
-
Low-impact favours or unverified “quick wins” Requests like “add one more chart” or “create a custom slide” sneak in under the guise of urgency. If they serve ego more than outcome or trust, decline or defer.
-
Internal comfort work Tasks done just to appease internal politics or reduce anxiety do not count as B3. They distract from real obligations.
In short: B3 exists to manage trust, not noise. If it does not protect reputation, compliance, or partnership value — it does not belong in B3.
Classification Quick Guide
| Type | Description | Default Treatment |
|---|---|---|
| Critical external | High-visibility obligation at real risk | Escalate; manage as a mini-B1 with clear deadline control. |
| Important partner | Commercially meaningful request | Schedule into the B3 cycle; communicate timeline and scope. |
| Internal top-down | Executive request | Align with OKRs where possible; explain trade-offs and capacity. |
| Courtesy / low impact | Minor or repetitive request | Decline politely or template / defer to B4 for exploration. |
This table is a guide, not a script — it helps you respond consistently instead of improvising under pressure.
The Expectation Conversation (5 Steps)
B3 work lives and dies by expectation management. Most frustration in stakeholder relationships does not come from bad intent — it comes from unclear assumptions.
The Expectation Conversation is ODUI’s practical script for handling requests diplomatically while protecting team focus. It helps you stay professional, honest, and calm, even when dealing with powerful stakeholders or demanding clients.
- Acknowledge the request and relationship Begin by recognising the other person and their perspective. A small moment of respect goes a long way.
Example: “Thanks for reaching out about this; I can see why it matters to you.”
This shifts the tone from defensive to collaborative.
- Clarify the urgency trigger, deadline reality, and desired outcome Do not assume you understand the need — ask. What outcome are they trying to achieve? Why now? What happens if it is delayed?
Example: “Just to confirm, the goal is to meet the regulator’s request by end of month — not tomorrow, correct?”
This separates facts from emotion and uncovers the real urgency behind the ask.
- Quantify the cost or trade-off (what this displaces) Every “yes” displaces something else — usually your B2 work. Make this visible.
Example: “If we prepare this custom report today, the API optimisation will move to next week.”
When trade-offs are transparent, stakeholders see that capacity is real, not endless.
- Commit or reframe with a clear timeline or alternative After you understand the urgency and impact, decide. Either commit with a specific date or reframe the request in a realistic way.
Example: “We can deliver the summary by Friday and the detailed version next sprint.”
Reframing keeps goodwill without surrendering control. It shows that you are cooperative and responsible.
- Close visibly — written summary, not verbal-only promise Capture the agreement in writing — a brief email, message, or ticket note.
Example: “As agreed, we’ll deliver the client data summary by Wednesday EOD.”
Written closure prevents future misunderstandings and keeps accountability clear.
In short: B3 is not about saying yes — it is about saying yes clearly. The Expectation Conversation replaces tension with transparency and keeps relationships strong without sacrificing focus.
How to Behave (B3 Discipline)
B3 is where firm empathy matters: you want to be helpful, but also structured.
- Be firmly empathetic — respectful and helpful, but clear about limits.
- Use a visible B3 board so commitments are transparent; avoid hidden side deals and back-channel promises.
- Time-box B3 windows so they do not quietly eat into B2 capacity.
- Escalate only when necessary — most B3 items can be handled calmly with clear agreements.
KPIs That Matter for B3
B3 is not measured by how many requests you complete. It is measured by how predictably, calmly, and transparently you meet obligations without letting them dominate your schedule.
Key indicators:
- On-time delivery vs agreed dates Measures how reliably you meet commitments made in Expectation Conversations.
Consistent on-time delivery shows maturity and control, even when volume rises.
Goal: deliver when promised, not necessarily faster — reliability builds trust faster than speed.
- Stakeholder satisfaction / trust trend Gauges how well your communication and follow-through sustain confidence over time.
You can measure this through short feedback surveys, post-delivery check-ins, or regular sentiment reviews.
Goal: maintain calm confidence — stakeholders should know you will deliver without constant reminders.
- B3 volume and age, and % of B3 converting into repeat asks Tracks the total number of active B3 tasks, how long they stay open, and how often similar requests reappear.
Rising volume or repeat asks indicate an inefficient pattern — a sign that something should be automated, templated, or declined.
Goal: reduce recurring noise. Mature teams handle a type of B3 once, document the solution, and move on.
In essence: B3 KPIs reflect trust management — steady delivery, calm communication, and the ability to handle obligations without drowning in them.
Common Pitfalls in B3
B3 work looks harmless on the surface — a few quick requests, an easy favour — but unmanaged, it slowly eats away at strategic focus.
These pitfalls show up quietly, often disguised as “helpfulness”. Recognising them early protects both trust and productivity.
- Treating B3 like B1 because of authority or volume When a request comes from someone powerful or frequent, teams often respond as if it were an emergency. This confuses authority with urgency and pushes true priorities aside.
Watch for: phrases like “the CEO asked for it” or “the client will be upset”. These are emotional triggers, not urgency triggers.
Fix: use the Expectation Conversation to bring logic and calm back into the exchange.
- Silent trade-offs (B2 gets cannibalised without visibility) Every B3 task takes time and that time usually comes from B2. The danger lies in unspoken compromises: teams accept B3 work without showing what gets delayed. Over time, growth work evaporates while everyone claims they are “fully busy”.
Fix: show trade-offs publicly. When leadership sees the impact on B2 metrics, decisions become deliberate instead of accidental.
- Saying “yes” without scope or outcome clarity Many B3 frustrations start here. Agreeing too early to undefined work. Without clear scope, success criteria, or deadlines, a “quick favour” becomes a recurring obligation.
Fix: never confirm a B3 commitment until you clarify what success looks like and what it replaces. A clear “yes” with boundaries is worth more than a hasty promise that burns trust later.
In short: B3 danger does not come from the requests themselves — it comes from unmanaged expectations. Calm structure turns political noise into predictable delivery.
3.6 B4 — Keeps Ideas Breathing
What B4 Is
An exploratory work that tests new possibilities without immediate obligation.
Quick test for B4:
If the honest answer to these questions is yes:
- Urgency: Is it safe not to act on this now — no deadline, no harm if we wait?
- Importance (potential): If this worked, could it meaningfully improve results or open a new option in the future?
- Evidence: Do we have a clear learning question or hypothesis, but not enough proof yet?
…then the work likely belongs in B4.
B4 is the organisation’s idea greenhouse — a safe and visible space for early concepts, prototypes, or hypotheses that hold promise but are not yet proven or ready for full execution. It protects creativity without overwhelming delivery.
B4 is not a wish list or a junk drawer; it is a structured waiting room for potential. It gives teams permission to explore, learn, and record insights — without derailing current priorities.
In ODUI terms, B4 is the exploration bucket.
In short: B4 gives ideas oxygen without letting them take over the room.
What Belongs in B4
B4 is for ideas that are promising but uncertain — where you need to learn more before you commit serious B2 capacity.
You can re-check the B4 test:
- There is no current urgency — it is safe to wait.
- There is real potential importance, if the idea proves true.
- There is a learning question or hypothesis, not just a vague thought.
Typical examples:
-
New product or service concepts Early sketches, concepts, or value propositions that could solve a real problem but still need validation.
-
Research spikes and experimental automation Short, time-boxed investigations into new technologies, tools, or techniques.
Examples: trying a new machine learning model, exploring a new workflow tool, or testing an internal script.
- Deferred opportunities with potential strategic fit Good ideas that do not fit right now but might align with future strategy or capacity.
Example: a promising market segment you are not ready to serve yet.
-
Stakeholder suggestions pending validation Ideas from clients, partners, or executives that sound attractive but lack clear impact, feasibility, or timing.
-
Internal “itch” ideas from the team Concepts from engineers, designers, or operations that could remove friction or open a new approach — but need evidence first.
What Does Not Belong in B4
B4 is a curated space, not a dumping ground.
Avoid placing the following in B4:
-
Work that is clearly B2 already If an idea has a clear outcome, KPI, and commitment, it belongs in B2, not parked in B4.
-
Old ideas nobody cares about If there is no sponsor, no clear user, and no realistic path to action, archive it with a short note. Keeping it in B4 only creates noise.
-
Hidden roadmaps B4 is for learning, not for storing secret future commitments. If it is “definitely happening”, it should move into real planning.
-
Parking for avoided decisions If something has been in B4 for months with no owner or next step, you are avoiding a decision, not exploring.
Rule of thumb: B4 is for exploration, not for parking decisions you are afraid to make.
Classification Quick Guide
| Type | Description | Default Treatment |
|---|---|---|
| Early concepts | Interesting, relevant, but unvalidated ideas. | Log in B4 with a short description and hypothesis. |
| Unclear stakeholder ideas | Requests that sound valuable but lack outcome clarity. | Refine, then place in B4 until impact and fit are clearer. |
| Future-fit opportunities | Ideas aligned with strategy but blocked by timing or capacity. | Store in B4 and review at each planning cycle. |
| Mature, outcome-ready ideas | Clear problem, user, KPI, and commitment. | Promote to B2; do not leave in B4. |
This table mirrors the logic in Chapter 11, but stays at classification level. Chapter 11 goes deeper into process and tooling.
How to Behave (B4 Discipline)
B4 requires a mindset of curious discipline:
- Keep ideas small and concrete — focus on the problem and possible outcome, not full solutions.
- Time-box exploration — if you run an experiment, define a small, clear window (hours or days, not months).
- Make B4 visible — a simple board or list where everyone can see what is being considered.
- Always ask: “What do we want to learn from this idea?” If there is no learning question, it is not B4 yet.
B4 is where you learn cheaply. The goal is not to prove every idea right, but to discover which ideas deserve B2-level commitment.
Signals and Simple KPIs for B4
Full B4 metrics, dashboards, and rituals live in Chapter 11. In Chapter 3, you only need a few simple signals:
-
Ideas moving out of B4 Are some ideas regularly graduating to B2 or being consciously archived? If nothing ever moves, B4 is becoming a graveyard.
-
Experiment size Are B4 explorations small, focused, and time-boxed? If they start to look like projects, they likely belong in B2.
-
Review rhythm Do you have a regular moment (monthly or quarterly) where you look at B4 together and make decisions?
These signals are enough at this stage. Chapter 11 expands them into a full measurement model.
Common Pitfalls in B4
Some failure patterns are worth watching for early:
-
The idea graveyard Ideas are logged but never reviewed or acted on. B4 turns into long-term storage.
-
Innovation theatre Lots of talk and demos, but no ideas ever reach B2 or production.
-
Stealth projects People use “exploration” as a label for unapproved projects that consume serious time.
-
B4 as a comfort parking lot Hard “no” decisions are avoided by endlessly keeping ideas in B4.
Chapter 11 returns to these patterns in more depth — with rituals, templates, and KPIs for keeping B4 healthy.
In essence: B4 exists so you can say, “Not yet, but not forgotten.” Chapter 3 helps you classify and behave correctly. Chapter 11 shows you how to run B4 as a system without losing control.
3.7 How Work Moves Between Buckets
In Chapter 2, you saw how ODUI helps you classify work into B1–B4. In practice, those buckets are not fixed labels — they are states that change as you learn.
Buckets are states, not identities. Work moves between them as context, urgency, or evidence changes. That movement is not a failure — it is a sign of a responsive, learning system.
Static buckets mean static thinking. Dynamic buckets mean you are adapting to reality instead of fighting it.
Why Movement Matters
Most teams treat prioritisation as a one-time event. ODUI treats it as a living rhythm.
Reclassifying work is a sign of learning:
- An idea proves valuable → it moves from B4 to B2.
- An improvement reveals hidden risk → it temporarily behaves like B1.
- A one-off favour becomes a recurring need → it moves from B3 into standard B2 work.
What matters is that every move is intentional, traceable, and evidence-based — not driven only by emotion or volume.
Ask regularly: "Given what we know now, is this still in the right bucket?"
Typical Moves (With Context)
Below are common, healthy movements between buckets and what they usually mean.
B1 → B2 — From Reaction to Prevention
When a crisis is resolved, its lesson should evolve into a long-term fix.
What it means: you are turning short-term defence into long-term strength.
Example: after a payment outage, the team creates automated monitoring and retry logic in B2.
This is how resilience compounds over time.
B4 → B2 — From Possibility to Progress
Once an experiment in B4 shows real promise or measurable value, it earns a spot in B2.
What it means: you now have enough evidence to invest seriously.
Example: a prototype chatbot reduces support tickets by 15%; it moves to B2 for full rollout and further optimisation.
B4 generates options; B2 turns the best options into reality.
B3 → B2 — From Obligation to Opportunity
When a recurring stakeholder request becomes predictable or clearly valuable, it should graduate to a standard process or feature.
What it means: you stop treating it as an exception and start treating it as a capability.
Example: clients repeatedly request the same custom report; you automate it in B2 as a self-service tool.
Good B3 patterns often reveal where B2 investment would reduce future noise.
B2 → B1 — From Improvement to Incident
Sometimes an upgrade or change introduces risk or breaks something critical.
What it means: a planned improvement has created an urgent stability problem.
Example: a new deployment causes data loss; it is temporarily treated as B1 until stability returns.
This does not mean B2 work was a mistake, but that learning now has to focus on safety, rollback, and stronger safeguards.
Other Helpful Moves
Not every movement fits the patterns above, but some are especially useful to notice:
- B4 → Archive An idea no longer fits strategy or has been disproven.
Healthy sign: you are willing to let go and reduce clutter instead of hoarding ideas.
- B3 → B4 A stakeholder suggestion that is interesting but unproven.
Healthy sign: you park it in B4 for structured exploration instead of saying "yes" immediately.
- B1 → B3 An issue that started as a crisis but now needs structured, non-urgent follow-up with stakeholders (for example, regulatory reporting after an incident).
Healthy sign: you separate urgent repair from slower, diplomatic work.
The exact patterns will vary by team, but the principle is the same: movement reflects learning.
Reclassification Rules
ODUI keeps movement transparent and rational with a few simple rules:
-
Write the reason for the move Note what changed — new data, failure, insight, or urgency. This builds institutional memory.
-
Keep a short change log Make bucket moves visible on your ODUI board so everyone can see why priorities shifted. Transparency builds trust.
-
Reframe the outcome statement If the work’s purpose or evidence changed, restate the goal so it still connects to a measurable outcome.
-
Review bucket balance after major shifts Too many items moving in one direction (for example, B2 → B1) can signal instability, poor planning, or missing prevention work.
Guiding question: At every move, ask — "What changed in importance or urgency, and what evidence do we have?"
That question keeps reclassification grounded in fact, not emotion. When work moves for the right reasons, ODUI becomes more than a prioritisation tool — it becomes a learning system that mirrors how your organisation actually evolves.
3.8 Capacity, Ratios, and Buffers
In Chapter 2, you saw a typical baseline for how work tends to fall into B1–B4 over time. Here, we focus on how to apply that baseline in day-to-day planning.
Think of buckets as capacity and attention budgets. Over time, a healthy baseline for many teams looks something like this:
- B1: < 10–15% — stability and resilience.
- B2: 60–70% — growth and progress.
- B3: 15–20% — obligations and diplomacy.
- B4: 5–10% — exploration and renewal.
This is not a rulebook. It is a starting picture.
Signals, Not Quotas
These ratios are signals, not strict quotas. They are not targets to hit, but indicators of how your team’s time and capacity are distributed. ODUI does not punish deviation — it interprets it.
- A sudden B1 spike means you are firefighting — you likely need to fix root causes, not just symptoms.
- A low B2 share signals that improvement work is being squeezed out by noise.
- A growing B3 load points to unclear boundaries or over-servicing stakeholders.
- A shrinking B4 space suggests your team is too busy surviving to innovate.
The goal is not perfect balance every week. The goal is awareness over time. You learn from the drift — when ratios shift, it is a clue to investigate behaviour, not just adjust numbers.
ODUI mindset: These are not quotas to enforce — they are mirrors to learn from.
Practical Tips for Managing Capacity
Reserve a B1 buffer Keep at least 5–10% capacity unplanned for genuine emergencies. This reduces panic and protects planned work. When B1 stays calm, convert unused buffer into prevention tasks in B2.
Time-box B3 windows and publish trade-offs Allocate specific slots or days for stakeholder and compliance requests. Document what gets delayed when B3 expands. Transparency turns politics into shared decisions instead of quiet pressure.
Set focus days where only B1 can interrupt B2 For example, Tuesdays and Thursdays are B2-only zones — no optional meetings, no B3 distractions. This helps teams reclaim deep work and measurable progress.
Track “bucket drift” monthly and rebalance early Use your ODUI view or dashboard to visualise how work proportions shift over time. Small corrections early prevent major burnout or imbalance later.
Use retros to discuss capacity, not just tasks Ask teams: "Did our week feel balanced?" Emotional feedback often reveals hidden overloads before metrics do.
Revisit ratios during major business shifts Launching a product? Expect B1 and B3 spikes. In quieter periods, double down on B2 and B4. Flex the mix — but always make it intentional, not accidental.
In essence: Ratios guide reflection, not regulation. The healthiest teams do not chase perfect balance — they notice imbalance early and act on it calmly.
3.9 Boards, Fields, and Visuals (Make It Obvious)
ODUI does not require special software — it requires clarity. You can run ODUI in any tool your team already uses (Jira, ClickUp, Trello, Asana, Notion, even spreadsheets). What matters is visibility and shared understanding, not the platform. A clear board turns prioritisation from an abstract conversation into a living picture everyone can understand at a glance.
Core Fields
Keep fields minimal and meaningful — each one should serve a decision or learning purpose.
-
Title, Owner, Bucket (B1–B4) Clear ownership prevents confusion. The bucket defines the nature of the work and the behaviour it requires (B1: crisis, B2: improvement, B3: diplomacy, B4: exploration).
-
Outcome Link (KPI or signal) Every card should point to a measurable impact — the reason the work exists.
This turns the board into a dashboard of progress, not just activity.
- Importance (1–5) and Urgency (1–5) Quick scoring helps determine relative weight. The numbers do not need to be perfect — they simply start the conversation.
When the score and the bucket disagree, talk about why.
- Evidence / Notes Capture context and supporting data: why this work matters, what triggered it, and what validation exists.
This prevents repeating the same discussions later and makes decisions auditable.
- Status Keep it simple: To Do → In Progress → Done → Learning.
Avoid overcomplicated workflows; you want flow, not bureaucracy.
- Next Review Date (especially for B3 / B4) These buckets benefit from scheduled check-ins to ensure items do not linger without progress.
You can always add more fields later, but starting simple helps teams actually use the board.
Visual Cues
Visuals are what make ODUI intuitive. A quick glance should show how capacity is distributed.
- Colour by Bucket Assign distinct, consistent colours (for example: red for B1, blue for B2, yellow for B3, green for B4).
Colour makes it obvious where the team’s time and attention go.
- Shape or Icon by Urgency A lightning bolt for urgent, a calm dot / circle for low urgency.
Icons and symbols convey emotion faster than text.
- Capacity Bars per Bucket Show how full each bucket is. When one is full, stop adding until something exits.
This makes real capacity visible instead of theoretical.
- Outcome Tags Label each card with a short outcome tag (for example: Retention, Reliability, Cost-to-Serve, Employee Experience).
These tags link work to value streams and make outcome distribution visible.
Goal: Anyone — even outside the team — should be able to glance at the board and understand what matters, what is active, and what is waiting.
Board Hygiene
A board is a mirror of team discipline. Clean boards signal calm; cluttered boards signal confusion.
- One intake lane All new requests flow through one entry point. No side doors, no exceptions.
This keeps the process transparent and fair.
- Weekly bucket review Spend 10–15 minutes checking whether items are still in the right buckets.
Reclassify based on evidence, not emotion.
- Monthly outcome review Reflect on whether completed work actually moved its KPIs.
This keeps the board outcome-driven, not just activity-driven.
- Auto-age cards Use automation or simple visual cues (for example colour fading or an "old" label) to highlight items that have not been touched in weeks.
Age is a signal — old cards either move, merge, or die.
- Limit Work in Progress (WIP) Prevent overload by defining how many active items can exist per bucket at once.
If something new enters, something else must finish or be paused.
Making It Obvious
The best ODUI boards are self-explanatory. Anyone can walk in and instantly see:
- Where the team’s time and attention are going (by bucket colour and capacity).
- What is urgent vs what is important (via icons, labels, and position).
- What is improving the system vs what is maintaining reputation.
If you need a long speech to explain your board, it is too complex.
In essence: The board is your shared brain — it replaces long debates with visible logic. When it is clear, decisions get faster and alignment becomes natural.
3.10 Quick Reference (Checklists)
These checklists give each bucket a simple at-a-glance guide. They are not full processes — they are memory aids to keep behaviour consistent when things get busy. You can print this page, keep it next to your board, or use it as a quick coaching tool.
B1 – Triage Checklist (Keeps You Alive)
Use when something might be a crisis.
-
Is revenue, legality, safety, or customer trust at risk now? If not, it is probably not B1.
-
One incident channel, one owner. Everyone knows where updates go and who is in charge.
-
Give clear ETA updates until resolved. Communicate impact → action → expected time to recovery.
-
Close with root cause analysis (RCA). Document what happened and why.
-
Create B2 prevention tasks. Turn the lesson into at least one concrete improvement.
B2 – Outcome Checklist (Makes You Great)
Use when planning improvement or growth work.
-
Clear outcome statement with baseline and target. What metric will change, from what to what, by when?
-
KPI instrumented before delivery. You can measure the impact as soon as the change goes live.
-
Focus windows protected. Block time for B2 work; break it into small, testable slices.
-
Review on KPI movement, not task count. Ask: "Did it work?" instead of "Did we ship it?"
B3 – Expectation Checklist (Keeps Others Quiet)
Use when handling stakeholder, partner, or executive requests.
-
Acknowledge and clarify outcome / urgency. Show you understand what they want and why it matters.
-
Quantify the trade-off. State what this work will displace if you say "yes".
-
Set a realistic date and scope. Agree on what will be delivered and when.
-
Confirm in writing and track visibly. Capture the agreement on your board or in a short message.
-
Review recurring asks for standardisation. If the same request repeats, consider turning it into B2 work.
B4 – Idea Checklist (Keeps Ideas Breathing)
Use when capturing and exploring new ideas.
-
Capture the idea with problem and potential outcome. Who is it for, and what would be better if it worked?
-
Define a time-boxed experiment with an evidence goal. What will you test, and what will you look for?
-
Agree kill / continue rules up front. Decide what success or failure looks like before you start.
-
Review B4 regularly. Move promising ideas to B2, archive the rest with a reason.
-
Celebrate B4 → B2 conversions. Highlight ideas that graduate — this reinforces healthy exploration.
3.11 What Good Looks Like (Patterns to Aim For)
When ODUI is working well, each bucket has a distinctive, healthy pattern.
Calm B1 – rare, fast, well-communicated; prevention quickly lands in B2. Crises happen, but they are handled cleanly and do not dominate.
Strong B2 – clear outcomes, visible KPIs, regular movement; interruptions are exceptions. Most time and capacity goes into measurable improvement, not reactivity.
Tidy B3 – obligations are predictable; relationships are strengthened by transparency. Stakeholders know what to expect and trade-offs are visible.
Alive B4 – ideas flow, stale ones are pruned; a steady trickle converts into B2. Exploration is active but curated, not a dumping ground.
When buckets work, the team feels focused but flexible. Work stops being a tug-of-war and becomes a portfolio of work types you can steer with confidence. Over time, "what good looks like" becomes visible on the board and in the calendar — more B2 blocks, fewer surprise B1s, predictable B3 slots, and a small but lively B4.
3.12 The ODUI Language
Here are the new ODUI terms introduced or used heavily in this chapter.
New ODUI terms (Chapter 3)
| Term | Meaning |
|---|---|
| Bucket discipline | The idea that each bucket has different rules (speed, communication, measurement, protection). |
| B1 purity | Keeping B1 only for real survival work, so everything doesn’t become an “emergency”. |
| B1 loop | Detect → Assess → Act → Communicate → Learn. A simple way to respond fast without chaos. |
| Resilience loop | The cycle of taking a hit, recovering, learning, and preventing repeats (B1 lessons feeding B2). |
| Resilience dashboard | A small set of B1 signals used to steer reliability (e.g., TtD, TtR, repeat rate, MTBI, and B1→B2 conversion). |
| TtD (Time to Detect) | How quickly you discover an issue after it starts. |
| TtR (Time to Resolve) | How long it takes to restore normal service after detection. |
| MTBI (Mean Time Between Incidents) | The average time between major incidents. |
| Repeat incident rate | How often the same or similar incident returns. |
| B1→B2 conversion | The percentage of B1 lessons turned into prevention tasks in B2. |
| ETA updates | Short, factual updates during B1: impact → action → expected time to restore/deliver. |
| B1 buffer | A small slice of capacity reserved for genuine emergencies. |
| B2 prevention task | A B2 item created from a B1 lesson to reduce repeat crises. |
| Firewall | A boundary that protects B2 time from being constantly stolen by B1/B3. |
| Expectation conversation | A short script to handle B3 requests: acknowledge → clarify → trade-off → commit/reframe → close in writing. |
| Idea greenhouse | A simple metaphor for B4: safe exploration without taking over delivery. |
| Bucket movement | Work shifting between buckets as urgency, importance, or evidence changes. |
| Reclassification rules | The lightweight rules that keep bucket movement transparent and evidence-based. |
| Signals, not quotas | Bucket ratios guide reflection, not enforcement. |
| Board hygiene | Simple routines that keep the ODUI board truthful and usable (reviews, one intake lane, cleaning old cards). |
| Auto-age | A visual cue that highlights items that have been sitting too long. Age is a signal. |
Support terms used in this chapter
| Term | Meaning |
|---|---|
| RICE / WSJF | Common scoring methods used in backlogs. ODUI can complement them, but buckets add behaviour and capacity rules. |
| Matrix / quadrant | A 2×2 chart (e.g., urgent vs important). Useful, but often becomes static if not maintained. |
| RCA (Root Cause Analysis) | A short review after a B1 event to capture why it happened and how to prevent repeats. |
| WIP (Work in Progress) | Everything currently being worked on. ODUI boards stay healthier when WIP is limited. |
Core ODUI questions (Chapter 3)
- B1 test: Is it urgent right now? Will it seriously hurt us if we don’t act now?
- B2 test: Can we safely schedule it? Will it meaningfully improve the future? Can we describe the outcome/metric?
- B3 test: Who expects this, by when, and what trust risk exists if we delay?
- B4 test: What do we want to learn, and how can we time-box that learning?
- Bucket movement check: Given what we know now, is this still in the right bucket?